Pages

Saturday, December 21, 2013

Cascade Delete - ADF

In this post i will show how to use cascade delete in master detail relation.

To create an association:
  1. In the Application Navigator, right-click the project in which you want to create the association and choose New.
  2. In the New Gallery, expand Business Tier, select ADF Business Components and then Association, and click OK.
  3. On the Name page, do the following to create the association:
    • Enter the package name in which the association will be created.
    • Enter the name of the association component.
    • Click Next.
  4. On the Entity Objects page, select the source and destination entity attributes:
    • Select a source attribute from one of the entity objects that is involved in the association to act as the master.
    • Select a corresponding destination attribute from the other entity object involved in the association.


In the Association properties

select the Composition association check box and then select the cascade delete check box


This option will allow you to delete the child rows in master detail relation.


Monday, November 25, 2013

ADF Entity Object - Entity level and Transaction level method validations

Created a simple application to Explain Entity level and Transaction level method validations.

Entity Level Validation

Entity-level method validators are similar to attribute-level method validators, except that they have a broader scope: the entire entity rather than a single attribute.

When you create an Entity-Level Method validation, The method is added to the entity object's custom Java class.

Click the Create and Select Method check box and provide the method name.


Select the Validation Level as Execute at Entity Level and provide the Condition to execute this method.

in this case i selected a Triggering Attribute as "EmployeeClubMember".


Provide the Failure Message.

Then a method will be created with the name you provided in Impl Class.

Transaction Level Validation

Transaction Level validation is use full if you want to validate Multiple Rows data.

Transaction level (rather than entity level) means that the validation will be performed after all entity-level validation is performed. For this reason, it may be useful if you want to ensure that a validator is performed at the end of the process.

Creation is same as Entity level only in the Validation Execution tab we need to select "Defer Execution to Transaction Level" .


In this Example, we need to pick employees for Employee Club. 

Rules:
Managers are not allowed under Employee Club.
One employee is allowed under one manager.


Sample Code screen shot.

Employee SKING is a manager so he is not allowed to Employee Club..
Employee 104 and 105 under same Manager "103". under same manager Two employees are not allowed.


You can download the sample code.

Thursday, November 14, 2013

ADF File Uplaod and Display in Inline frame or popup

Created a simple application to upload, download files and store in Blog object.

Create a simple database table.

CREATE TABLE FILES
(
  SNO NUMBER(5, 0) NOT NULL
, FILENAME VARCHAR2(50 BYTE) NOT NULL
, FILEBLOB BLOB NOT NULL
, FILETYPE VARCHAR2(20 BYTE) NOT NULL
);

CREATE SEQUENCE FILES_SEQ INCREMENT BY 1 MAXVALUE 9999 MINVALUE 1 CYCLE NOCACHE ORDER;

Create a simple model to store files in database.


Created a simple client method to store data in database.

    public void uploadFile(BlobDomain file,String fileName,String fileType){
        Row row = getCreateFileVO().createRow();
        row.setAttribute("Fileblob", file);
        row.setAttribute("Filename", fileName);
        row.setAttribute("Filetype", fileType);
        this.getDBTransaction().commit();
    }

The inputFile component can be placed in either an h:form tag or an af:form tag, but in either case, you have to set the form tag to support file upload. If you use the JSF basic HTML h:form, set the enctype to multipart/form-data. This would make the request into a multipart request to support file uploading to the server. If you are using the ADF Faces af:form tag, set usesUpload to true, which performs the same function as setting enctype to multipart/form-data to support file upload.


Created a simple UI to display files in database and to upload new file.

      <af:panelGroupLayout id="pgl1" layout="horizontal">
        <af:inputFile label="Select File:" value="#{managedBean.file}" id="if1"/>
        <af:commandButton text="Upload" id="b1" action="#{managedBean.doUpload}"/>
      </af:panelGroupLayout>

To hold the input file value created a managed bean and create a variable based on  org.apache.myfaces.trinidad.model.UploadedFile interface.

To store data in database we need to convert this file to BlobDomain object.

    private BlobDomain convertToBlobDomain(InputStream in) throws SQLException, IOException {
        BlobDomain blob = new BlobDomain();
        OutputStream out = blob.getBinaryOutputStream();
        writeInputStreamToOutputStream(in, out);
        in.close();
        out.close();
        return blob;
    }

To download file from data base we need to cover the blog object o stream.

if you want to download file then
 
<af:commandButton value="Download">
  <af:fileDownloadActionListener filename="hello.txt"
      contentType="text/plain; charset=utf-8"
      method="#{bean.getFile}"/>
</af:commandButton>
 
public void getFile(FacesContext context, OutputStream out) throws IOException{
  OutputStreamWriter w = new OutputStreamWriter(out, "UTF-8"); 
 
   . . .
  out.write(byteBuffer, 0, b) 
 
  . . .
}

To display a file in ADF page we need to output stream .

in this example i displaying a file in ADF inline frame.

        <af:panelGroupLayout id="pgl3"  styleClass="AFStretchWidth" >
          <af:inlineFrame id="if2" partialTriggers="t1" source="/servlets/downloadfile?psno=#{managedBean.sno}"   styleClass="AFStretchWidth" inlineStyle="height:500px;"/>
        </af:panelGroupLayout>

Create a simple Servlet and convert the blob data to stream.

Sample UI's

Uploaded a simple PDF and displaying in inline frame.
Uploaded a simple Image file.


You can download the sample code.

Tuesday, November 12, 2013

Drag and Drop Capabilities in Hierarchy Viewer

In this example we are adding Drag and Drop functionality to Hierarchy viewer. 

To create a Hierarchy viewer fallow this post (Hierarchy Viewer and Tree Table Sample).

Modified existing EmployeeAM and added new instance to update employee's manager "UpdateEmployeeVO"..


Created new client interface method to update manager "updateManager".


Added Drag and Drop capabilities to hierarchy viewer.
 

Note: Drag and Drop is based on the "discriminant" attribute.

The discriminant for the default DataFlavors generated by this drag source. The discriminant is used to segregate drags from this drag source. Please note that drag and drop can only be performed between compatible drag sources and drop targets. The discriminant is used for the compatibility purpose. The discriminants of the DataFlavors generated by the default drag source must match the allowed discriminants on the allowed DataFlavors of the drop target.

 To handle the drag and drop created a bean  method.

        Transferable transferable = dropEvent.getTransferable();
       
        Map dropSite = (Map) dropEvent.getDropSite();
        String dropTargetClientRowKey = (String) dropSite.get("clientRowKey");
        if (dropTargetClientRowKey == null) {
            return DnDAction.NONE;
        }
        UIHierarchyViewer hv = (UIHierarchyViewer) dropEvent.getDropComponent();
        CollectionModel hvCollectionModel = (CollectionModel) hv.getValue();
        JUCtrlHierBinding hvTreeBinding = (JUCtrlHierBinding) hvCollectionModel.getWrappedData();
       
        Object dropTargetRowKey =
            hv.getClientRowKeyManager().getRowKey(FacesContext.getCurrentInstance(), hv, dropTargetClientRowKey);
       
        JUCtrlHierNodeBinding targetNode = hvTreeBinding.findNodeByKeyPath((List) dropTargetRowKey);
        Row targetRow = targetNode.getRow();

        DataFlavor<RowKeySet> modelPlanRowKeySetFlavor = DataFlavor.getDataFlavor(RowKeySet.class, "EmployeeHierarchy");
        RowKeySet modelPlanRowKeys = transferable.getData(modelPlanRowKeySetFlavor);
        Row sourceRow = null;
        if (modelPlanRowKeys != null && !modelPlanRowKeys.isEmpty()) {
            Iterator rksIterator = modelPlanRowKeys.iterator();
            while (rksIterator.hasNext()) {
                List key = (List) rksIterator.next();
                if (key.isEmpty()) {
                    continue;
                }
                JUCtrlHierNodeBinding sourceNode = hvTreeBinding.findNodeByKeyPath(key);
                sourceRow = sourceNode.getRow();
            }
        }

Once we identify the source and target we are calling the am method to persist the changes.


Sample UI.

To enable the drag and drop select a node and hold for a second then drag the node and drop on  target.


You can download the sample code.

Thursday, November 7, 2013

ADF TreeTable - Create new child under selected record

In this example i am adding Create operation to TreeTable (Similarly you can do for Tree also).

To create a ADF TreeTable please fallow this post, Hierarchy Viewer and Tree Table Sample

Modify existing EmployeeAM and added new view instance "CreateEmployeeVO".


Create AM class "EmployeeAMImpl" and added "createEmployee" method.


Create ADF form based on the newly created "CreateEmployeeVO".


Create page bindings to "add new row" and "createEmployee" method.


To create a child under selected node, we need to identify the selected node.

to get he selected node from TreeTable we need to use the iterative Key method.

    public Key getSelectedNodeRowKey() {
        if (treeTable != null && treeTable.getSelectedRowKeys() != null) {
            for (Object key : treeTable.getSelectedRowKeys()) {
                treeTable.setRowKey(key);
                return ((JUCtrlHierNodeBinding)treeTable.getRowData()).getRowKey();
            }
        }
        return null;
    }
   
    public RowIterator getSelectedNodeRowIterator() {
        if (treeTable != null && treeTable.getSelectedRowKeys() != null) {
            for (Object key : treeTable.getSelectedRowKeys()) {
                treeTable.setRowKey(key);
                return ((JUCtrlHierNodeBinding)treeTable.getRowData()).getRowIterator();
            }
        }
        return null;
    }


Sample UI screen shots.


You can download the sample code.

Wednesday, November 6, 2013

Hierarchy Viewer and Tree Table Sample

A hierarchy viewer component can be used to visually display hierarchical data. Hierarchical data contains master-detail relationships within the data. For example, you could create a hierarchy viewer component that renders an organization chart from a data collection that contains information about the relationships between employees in an organization.

Created a simple Data Model for Employee and Manager relationship.


Create a view link between Manager and Employee with cardinality 0..1 to * (one to many).


To display the Hierarchy viewer we need to identify the root node. if you miss this step hierarchy viewer will display the multiple root nodes.


To avoid multiple root nodes, i am creating the view criteria with the condition managerid is NULL.


Then we need add this view criteria only for the root node (Otherwise hierarchy view will only render with one node).

(Select on the EmployeeVO under Data Model section -> Edit)

Move the findEmployeeRoot view criteria.

Now we are ready with out model project. go to the Data Controls section and refresh it.

Hierarchy Viewer:

Drag the EmployeeVO data control to the page and select Hierarchy viewer from the list.

Then create you Hierarchy viewer node. We can select what all data to be displayed in the selected zoom level.


It will create a list binding in the bindings file. (Both the Hierarchy view and Tree table will use the same  list bindings).


we are done with UI. Sample screen shots.


Tree Table:

To create the tree table we need the same Data model. when we drag and drop the data model to page we need to select the Tree Table.


Jdeveloper by default will display only one column in the Table. so we need to add the columns.

(Sample Code)

UI screen shots.


You can download the sample app.

Tuesday, November 5, 2013

Bi Publisher Firefox Quick Fix

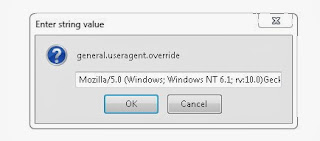
Oracle Bi Publisher  has a problem after upgrading to the newer versions of the Firefox browser. it will show an error message "Your browser is not supported by Oracle BI Presentation Services".

You can temporarily fix this issue by modifying the Firefox configurations.


  • Open the Firefox configurations "about:config".
  • Create a new String with Name and Value "general.useragent.override", "Mozilla/5.0 (Windows; Windows NT 6.1; rv:10.0)Gecko/20100101 Firefox/9.0" (Right click -> New->String).
  • Restart the Browser.

NOTE: If you are on Bi publisher 11.1.1.5, then apply BP2 patch and it will take care of this issue.


Thursday, October 31, 2013

ADF - Contextual Events Sample Application using Row Selection Listener

How we can use contextual events in the ADF Table Row Selection Listener.

About Contextual Events

Contextual events have two parts:
  • A publisher (or producer), such as a button that raises a named event, with or without a custom payload
  • A handler (or consumer) that listens for a specifically named event or a wildcard event, to process that event
Contextual events are very much useful when two different Application (ADF) are using or Webcenter inter portlet communication. When we are facing difficulty to pass parameters through TaskFlow or beans then contextual events are more useful.

We have two regions (TaskFlows), one with list of employees and second will display the employee details based on the user selection from employees list (we can wright this application without using contextual events also).
For this example i created a sample data model for Oracle HR database.


A simple UI application

If we use the ADF commandlink component tag have the feature to raise the contextual events directly.

Producer:
In this example i am going to override the rowselectionlistener and raise the contextual event.


To raise the event we need to create a custom event binding, this will raise the contextual event (Event Producer).

Make sure that we need to add Listener to raise the event(org.apache.myfaces.trinidad.event.SelectionListener) and Events and event with event name.

(Go to the Event binding in the structure window -> Right click-> inside the event bindings -> events.
 Then select the Events ->Right click -> event)

And we need to pass the payload value.


Consumer:

Fist we need to add our event handling method in page bindings.

In this example i added my Application module method directly, But we can create a java class and then convert that class in to data control and use those methods.
Then go to page bindings tab ->contextual events-> subscribers-> add

Provide the Event name and handler classe.
Note: we need to use same event name which we used int he Producer.


Ui screen shots.

Select the employee form the list it will raise the contractual event and employee view region will handle this event.

you can download the sample app.